Mark Crossfield: Let me fix your golf short game
Last updated:
Fix your short game for lower golf scores with the help of PGA Professional and YouTube superstar, Mark Crossfield.
One of the first online golf coaches, PGA Professional Mark Crossfield set up his YouTube channel in 2007.
Since then his unique blend of straight talking, powerful, effective content and sense of humour has won him a legion of followers. To date, the channel has had 228 million views and has 346,000 subscribers… many of whom will know about his short game struggles.
RELATED: The 100 Most Influential People In Golf

Meet Mark Crossfield
“When I was younger, I used to be a decent chipper and pitcher of the golf ball; in fact, I built my game around it,” Crossfield tells TG. “But, as anyone who follows me on YouTube will have witnessed, in recent times my chipping and pitching has left quite a lot to be desired. I was hitting fats, thins… painful shots familiar to every club golfer.
“So, during the first lockdown last year, I decided to do something about it. Thankfully, I found a new approach that has given me back the consistency, confidence and creativity I used to feel. In this article – and on video on my channel – I will share the solution. Just as every golfer can relate to the problems I was having, these answers are equally universal and easy to adopt.
“But let’s start with a fundamental change in our approach to hitting chips and pitches. It set me on the road to a vastly improved performance… and it can do the same for you.”
RELATED: Tested – Best Wedges
Understanding how to use your golf wedges
This fundamental change of approach to your short game begins with a close-up look at your wedges – specifically the bottom edge, or sole. This is, perhaps, the most important part of the club, because it’s the bit that interacts with the ground. Let’s focus on the front edge of the sole – often called the club’s leading edge – and the back edge.
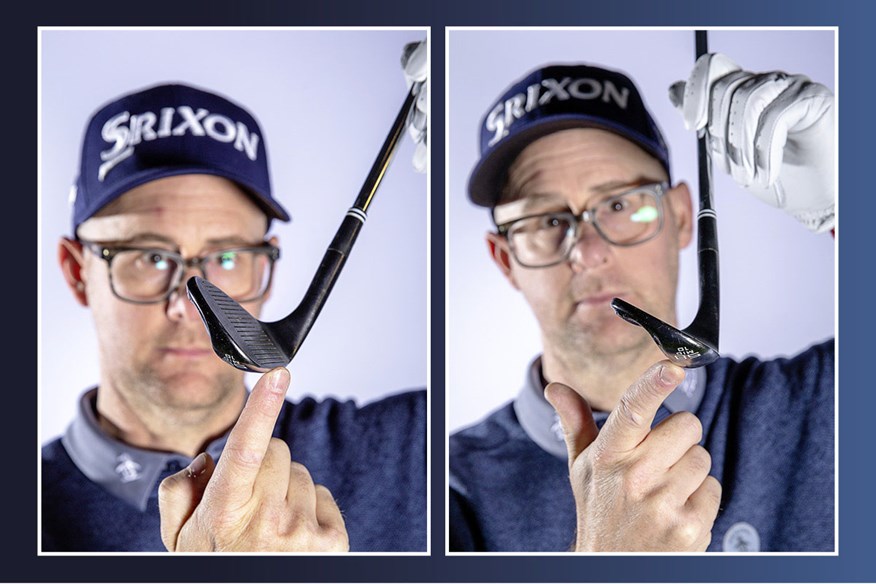
Front edge The club’s leading edge is angled and sharp, like a knife: and like a knife, it wants to cut or dig. The steeper the attack, and the more the handle is angled forward, the more you sharpen this leading edge and the more the club wants to cut into the turf.
Back edge As you can see, the back edge of the sole is curved, rounded, more like the bottom of a spoon. If it engages the turf it delivers what I call an ‘inoffensive’ interaction, skidding forward rather than digging down. But it can only perform this way when the attack angle is shallow and the shaft angle is more upright, or neutral.
RELATED: Me And My Golf’s best-ever tips
Margin for error
Here is the back edge of the sole in action. I’m striking a ball off a plastic board… the barest lie you could find.

As you can see by the way the ball is jumping, the back edge of the sole has just made contact with the board… at least an inch behind the ball. But because it is curved, it can skid into the ball and still deliver an effective strike.
This gives your strike a decent margin for error, massively boosts consistency and is the reason the club is designed this way. But, like many players, I wasn’t taking advantage of it…
Short game misstrikes: Front edge golf
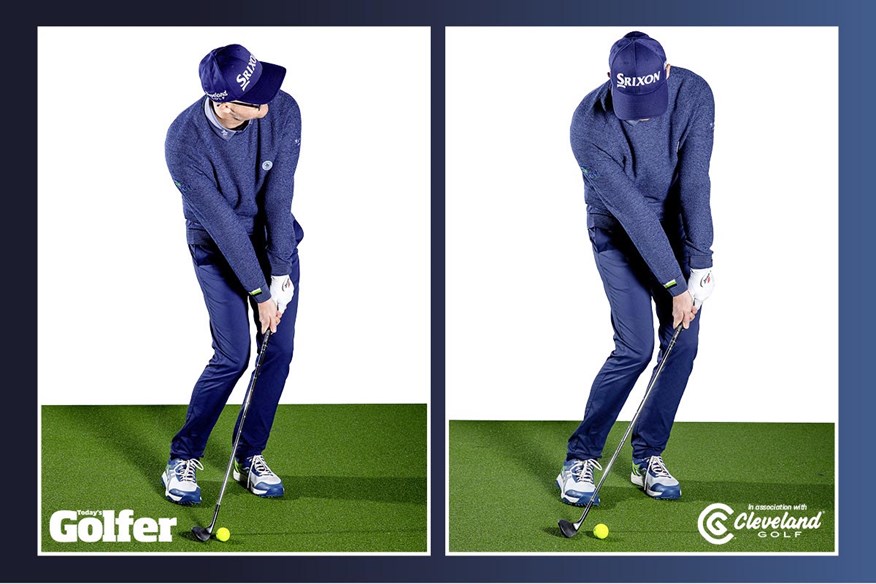
I learned the game in an era when the short game was taught differently from the way it’s coached today. Back then, the approach was very much based around striking down sharply on the ball, and employed the following, familiar set-up…
* Ball back in the stance to encourage a downward attack angle.
* Hands pushed forwards… again to promote a descending strike.
* Weight into the lead side to help get the swing’s low point on the hole side of the ball.
Then, the action itself was what gets called ‘hinge-and-hold’ – you would hinge the wrists during the backswing to create a steeper arc, and then drag the handle forward, holding on to that wrist angle through the ball… preserving shaft lean and promoting clean, crisp contact. Well, that’s the theory, anyway.
Club dump
Now, with a better understanding of the sole and how it works, it’s not hard to see how this approach might cause problems. Everything about it creates steepness, shaft lean and a downward strike, driving that sharp, leading edge straight down into the turf.
Unless your timing is spot-on, you can easily dump the club into the ground before the ball. And it doesn’t take many of those to rob you of your confidence. Pretty soon the speed goes out of the stroke, and thoughts of creativity disappear.
Perfection only
It’s important to acknowledge that this technique can work, and work well. I myself used it successfully for many years. If you are using something similar and chipping well, do not change! But, as many of us have discovered over the years, it does have one major weakness – it gives very little margin for error when chipping.
RELATED: Which Srixon and Cleveland iron is best for me?
Sole trader
This is basically where I’d got with my chipping and pitching. Without the time and opportunity to practise regularly, my timing got a little off… and with that, my striking deteriorated.
The solution I found was to develop a shallower technique based around the trailing edge of the club – not the leading edge – engaging the turf. Admittedly it takes a little leap of faith; striking down feels comfortable, like you’re eliminating heavy contact. But it is a false comfort.
True confidence comes not through avoiding the ground but being comfortable enough to actively use it: trail edge chipping and pitching gives you that.
Let’s start with chipping…
MARK CROSSFIELD FIXES YOUR GOLF CHIPPING
Set up to use the trailing edge
While the old-style, leading-edge chip was based around creating a feeling of steepness in the attack, my new trailing-edge action focuses on themes of shallowness and rotation. Promote these elements through the way you address the ball.
Straight connection
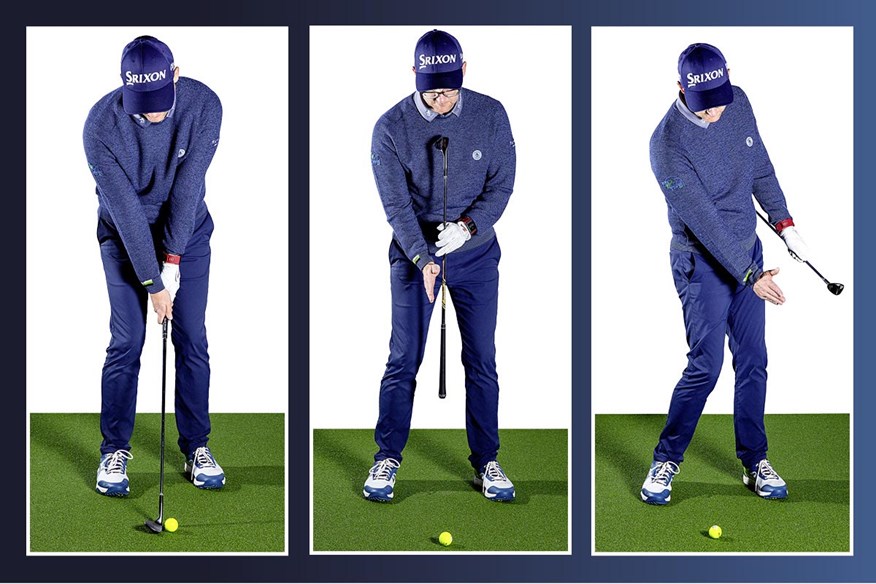
In this address, the hands are not forward and there is no shaft lean. Instead, set up so the ball, the clubshaft, your hands and your zips – trouser and chest – form one line. This is what we might call a default position for the standard chip. Later in the article, we will look at how to adjust it to hit the ball higher and lower.
Wider stance, more even weight spread
Take out any tendency to lean into your lead side by setting your weight evenly on both feet – or just marginally favouring the front foot. Widen your stance to foster a more rotational move and to quieten overactive knees. Flare your lead foot, again to encourage a more rotational move through the ball.
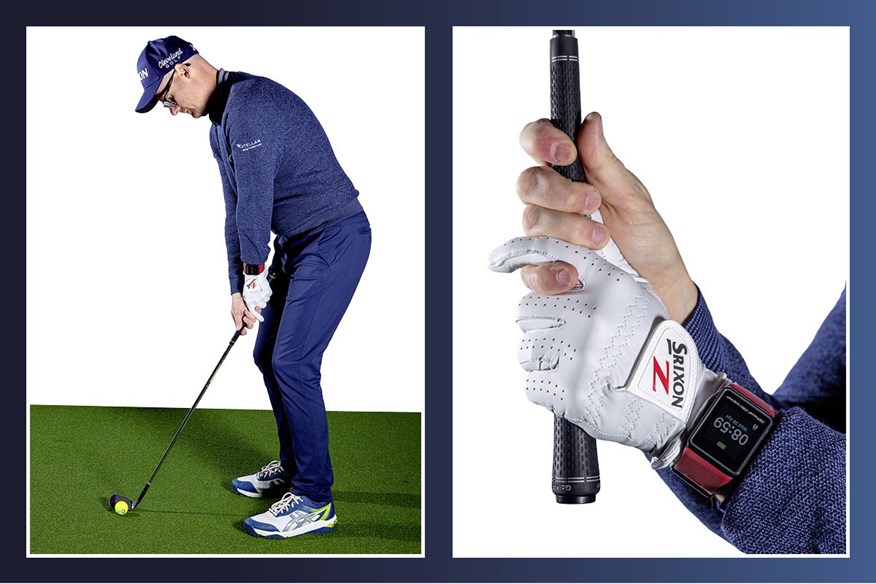
Three other set-up changes you should consider
Use your address to promote rotation, control and inoffensive ground interaction…
Open up
Aim feet, hips and shoulders slightly open – that’s just left of parallel to the ball-hole line for the right-hander. This will help you develop the feeling of more core rotation on the way through, and reduce the chances of you feeling you have to flip the hands over to square the face.
Mid-grip hold
Gain control of the shot by gripping the club in the centre of handle. You can go down the handle to ‘shorten’ the club on shorter shots, but rarely if ever would I advise playing chip shots from the top of the grip.

Mind the gap
Today, I actually set up with the clubface an inch or so behind the ball and am comfortable with the sole striking the ground anywhere in that zone. When you know you can make contact with the ground before the ball and the strike will still be fine, it does wonders for your confidence.
RELATED: How to cope when your form deserts you
CHIPPING: DEVELOP A TRAILING-EDGE MOTION
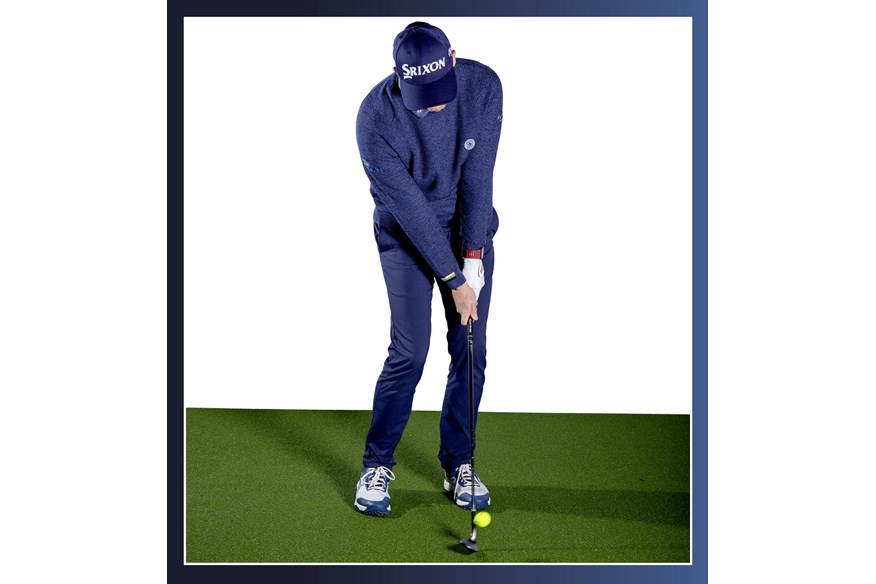
The set-up is all about helping you impact the ground with the trailing edge, rather than the sharp leading edge. The central ball position and lack of shaft lean is designed to encourage a more rotational action and a much shallower arc through impact. But it’s now up to your motion to make sure you deliver the club in the right way.
Let’s look at three ideas that can help you nail the ideal motion…
Chipping Feel #1: Turn away, turn through
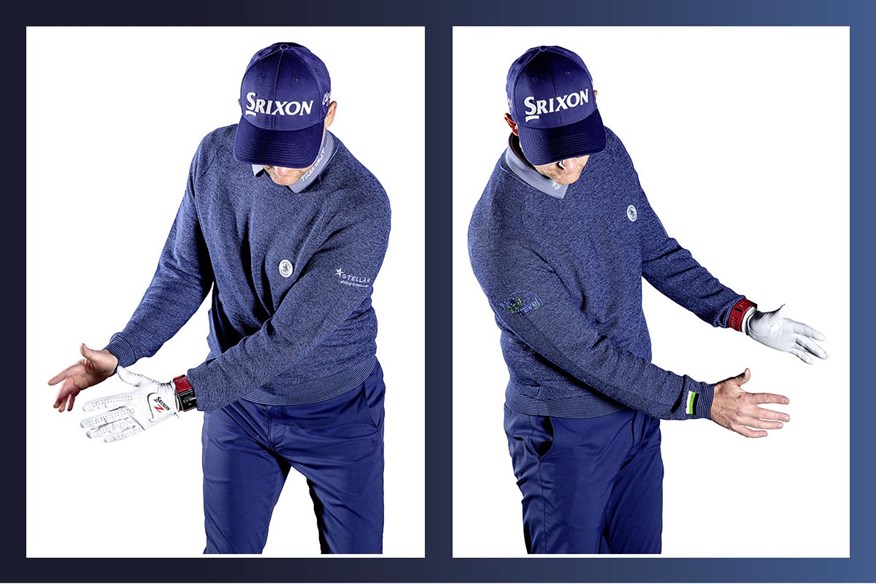
To give your action the rotational quality that delivers a shallower attack angle, I want you to feel this short action is powered by a simple body turn, away and through, with the hands and arms quiet. To achieve this…
* Soften your arms. Even feel some slight flex in the elbows at address. This will help them follow the turn of the body.
* Feel your upper arms and elbows are attached to the seams of your jumper and shirt. Then, as the chest and hips rotate away and through, your arms will have
the feeling of going along for the ride.
Try this at first without a club; it will help you feel softness in your arms and that connection between upper arms and body. Keep your rotation centred, as if rotating around your chest. As the move becomes more comfortable, introduce the club and try hitting shots.
Chipping Feel #2: Let your trail hand release
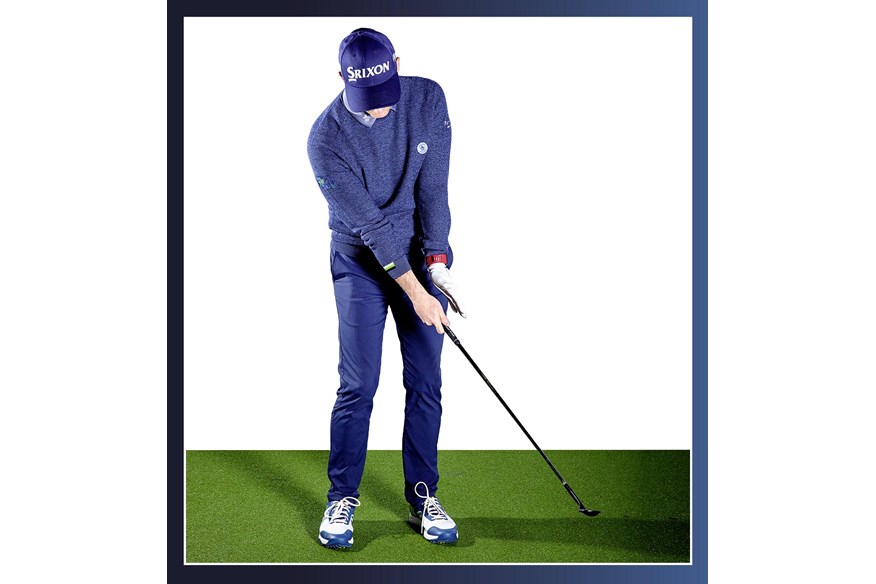
This is a tricky one, given all we have learned about compressing irons and avoiding a flicky release.
But with chip shots we are not trying to create power – our priority is solid contact with a slower-moving clubhead that can easily stall if the leading edge digs. Shallowing the attack to allow the sole to surf or brush the grass becomes increasingly important.
Clubhead passes handle
To develop this shallower attack, allow the clubhead to release past the hands through impact. Feel the back of the trail wrist flatten as you swing through. This release can feel a bit flicky at first and takes some getting used to, but once you feel the solid strike it creates – and know that pre-impact ground contact will not ruin the shot – you can start to trust it.
Lead wrist flexes
You are quite possibly used to playing chip shots with a firm lead wrist. This encourages a dragging action and a steeper attack. Instead, allow that lead wrist to soften and hinge up as the trail hand releases. This will take some getting used to but it’s an important part of the ideal, releasing club delivery.
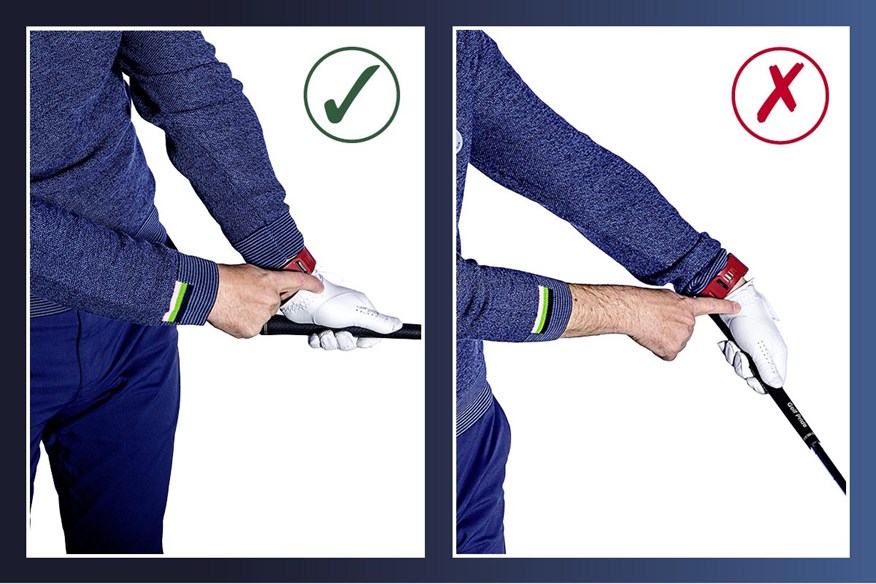
No drag
Here, for reference, is the opposite move, the lead wrist bowing as this dominant hand drags the handle through. We want to get away from any sign of this because it steepens the attack and introduces that sharp leading edge. So instead, work on the feeling of your trail hand releasing under and through, catching up and eventually overtaking the handle.
RELATED: Which Srixon golf ball should I play?
Chipping Feel #3: Stomach and chest through and up
Combining the first two feels of connected core rotation and release, this final feel helps ensure you deliver the club on the ideal shallow arc.

Extend up and out
You are quite probably comfortable with the notion of turning your chest through to face the target. But I also want you to feel like it looks upwards as much as possible, as if facing the top of the flagstick. From a bent-forward posture, this will feel like an extending move as you turn through. This extending throughswing may not come naturally to you. Practise it by placing the club against your chest and rotating through with the shaft above horizontal.
Lead shoulder focus
There is a solid reason for this move: extending up and out like this helps pull the handle up and across you. That, in turn, throws the clubhead down, out and through, shallowing the delivery and improving the strike. Pulling your lead shoulder up and back can help you make the right move.
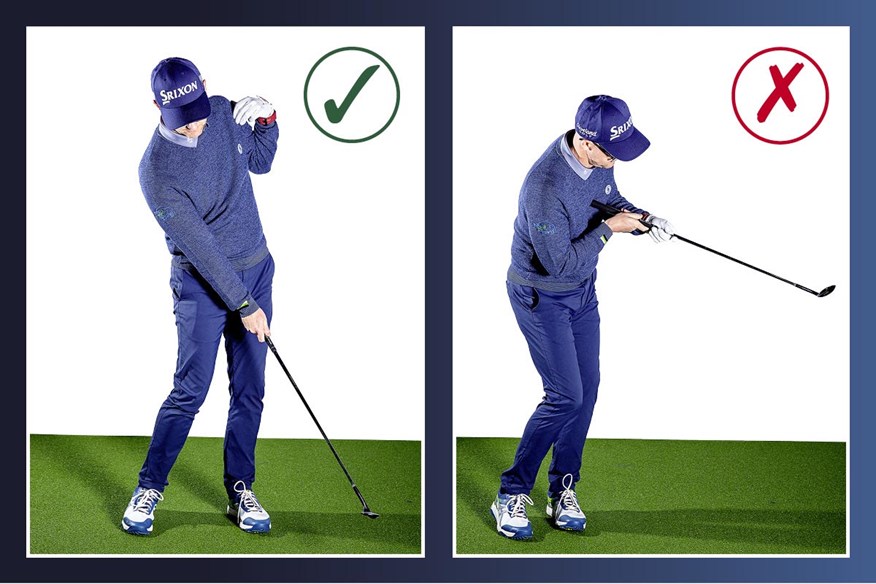
Low point
Again, feeling the opposite, wrong move can help you appreciate where you need to be. When your chest remains pointing downward, the club cannot shallow and your attack can become too steep. You can expect duffs and thins.
Shallowing out
Practise these three moves and you will start to develop a much longer, shallower base to the arc of your chipping action, the source of this greater strike forgiveness and margin for error. This means a strike which barely moves the ground; you should just be brushing the grass as you swing through. I can hit 10 chip shots without having to change the position of the ball… can you?
RELATED: Which wedge performs best when it’s wet?
MARK CROSSFIELD FIXES YOUR GOLF PITCHING
Same principles, longer swing
For me, the only difference between the fundamental pitching and chipping actions is scale. The pitch is just a longer swing based on the same principles of creating a rotational, shallow action that sees the curved back edge of the sole deliver its inoffensive contact with the ground. Let’s recap the basic set-up position, before learning three ways to improve your pitching performance…
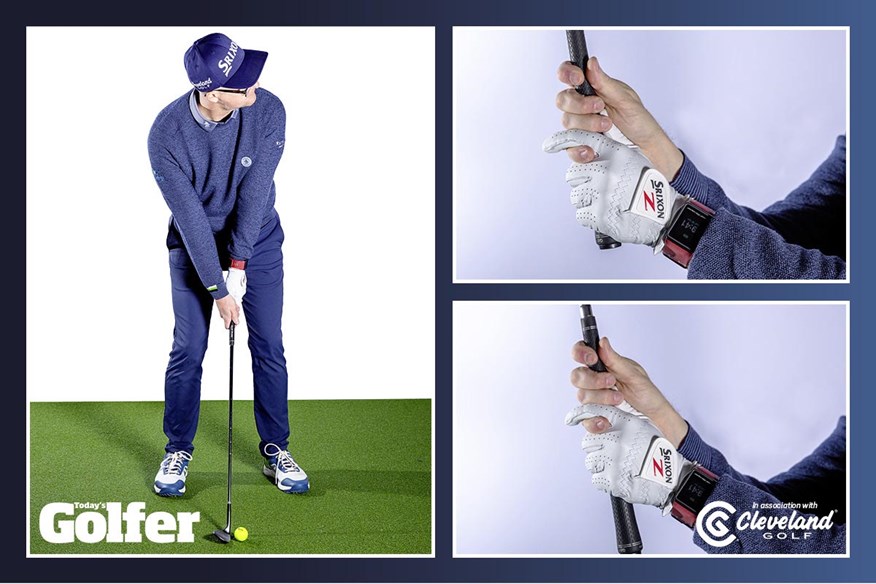
Set neutral lines
Once more, build your address around a neutral, central line of shirt buttons, trouser zip, handle, shaft and ball. Setting this relationship is the key to delivering the club on a shallow angle, and allowing the back edge of the sole to engage the ground. It also promotes a balanced feeling of turning around the centre of your chest.
Hip-width stance
Because the pitch is a longer swing, you need a slightly wider base to contain and control it. Set your stance at around hip width. As before, open your stance a touch and flare your lead foot to create a more comfortable throughswing rotation, and just marginally favour your front foot with weight.
Play with the length of the club
Pitching can cover any distance from 25 to 100 yards. Because of this range, don’t be afraid to play with the length of the club, in terms of where you place your hands on the handle, to add or reduce power. Work from the middle of the grip for mid-range pitches; consider moving up the handle for the longer shots, and down the handle for shorter ones.
RELATED: Tested – Best Premium Golf Balls
Basic pitching motion: Four ideas for you to experiment with
If there is a theme to working on your pitching swing, it’s control. Pitch shots are, of course, about directional accuracy, but also about harnessing power; as a consequence, the pitching action is smaller and more contained than many club players think. The following four ideas will help you develop a more measured action that will see you pin high more often…

#1 Stacked rotation: Get away from full-swing fever
Probably the most common error I see in amateur pitching is golfers bringing their regular, full swing into the shot. With a power mandate, the full swing introduces elements like twist, lag, drive and lateral shift into the equation: that’s all too crashy and unmanageable for a feel shot. To get away from this, work on the idea of a stacked, central rotation.
Establish your lines
To help you feel this more controlled move, hold your wedge in front of you as shown to establish your centre line. Make sure it runs from shirt buttons, over your trouser fly and points down towards a central ball position.
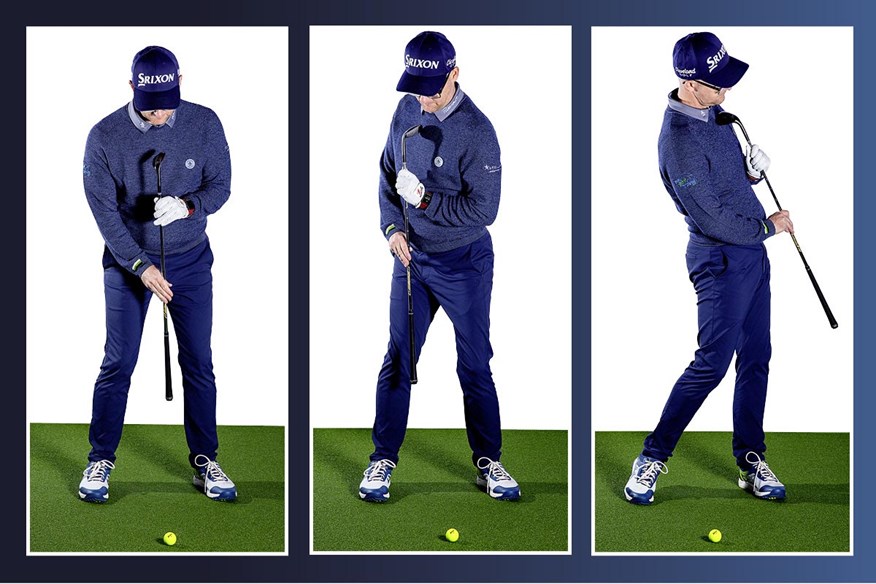
Turn together
As with the chip shot, power your swing through a core rotation, chest and hips turning as a unit. Maintain a centred look by feeling your chest rotating over your lower body. Do this right and the clubshaft remains vertical.
Rotate and extend
Rotate through, hips and shoulders again working as a unit; there should be none of the one turning against the other, as in the long game. Repeat the up-and-out extension feeling we learned in the chipping motion, chest and stomach facing forward and up. As before, this pulls the hands across you and shallows your attack.
#2 Create ‘stopping points’
With distance control so important to pitching, it’s vital you can meter the energy you’re putting in to the strike. I believe the best way to do this is by using swing length and speed to control distance.

Create for yourself a medium swing pace – one you can repeat comfortably – then work on equivalent stopping points for your action either side of the ball, using your hands as a reference. I might use ‘pocket-to-pocket’ or ‘shoulder-to-shoulder’ as pictured here; it doesn’t matter if your swing actually stops there; it’s just a feeling and a reference for you to control swing length. By altering swing length – and clubs – you can develop a go-to swing for any pitching distance.
#3 Release the club: Trail-arm only swings
With the chipping action we talked about the clubhead overtaking the handle, but in pitching, if anything, the principle is even more important.
So many amateurs want to deliver the club with the handle way forward and the head lagging well behind. This encourages a steeper attack and that leading edge to dig, which is exactly what we’re trying to avoid. A great drill to train the proper release is to hit shots with your trail hand only.

With the dragging influence of the leading hand removed, the trail hand release becomes the only way to put speed and energy into the club. Hit a series of shots like this, getting used to how this releasing motion encourages the rear portion of the sole to bruise the turf.
#4 Elbows soft at the end
As with the chipping, soft arms give your swing rhythm and help your core rotation turn the club forwards.
A great way to work on this is to finish with some flex or bend in your elbows. Straight arms suggests tension; keep them soft throughout your swing and check that, as you finish, there is still some angle at the elbows.

RELATED: Lower golf scores in five easy steps
MARK CROSSFIELD ADDS VERSATILITY AND CREATIVITY TO YOUR SHORT GAME
This feature has set out a different approach to chipping and pitching. Practise these moves and you will start to develop a much longer, shallower base to the arc of your action, the source of this greater strike forgiveness and margin for error. Your strike should barely disrupt the ground.
Within this technique, though, it is, of course, important to remain creative. Here are three simple ways you can add that much-needed versatility to your short game – without compromising these principles…
#1 Change ball position

These three balls represent positions for three standard shots: central (mid-height), slightly back (lower) and slightly forward (higher).
You can change trajectory simply by shifting between them, though consider adding a little more front-foot weight on the lower shot and a little more trail-hand release on the higher one.
#2 Change clubs

In altering the carry-and-runout ratio of the shot, it always makes sense to let the club do the work: shot data analysers consistently see greater success in golfers who regularly switch short-game clubs.
My advice is to work around an 8-iron (lower, more run), gap wedge (generally around 50-50 carry to run) and sand wedge (higher, less run). These three clubs can cater for the vast majority of shots the club golfer has to play.
#3 Choose your ideal bounce
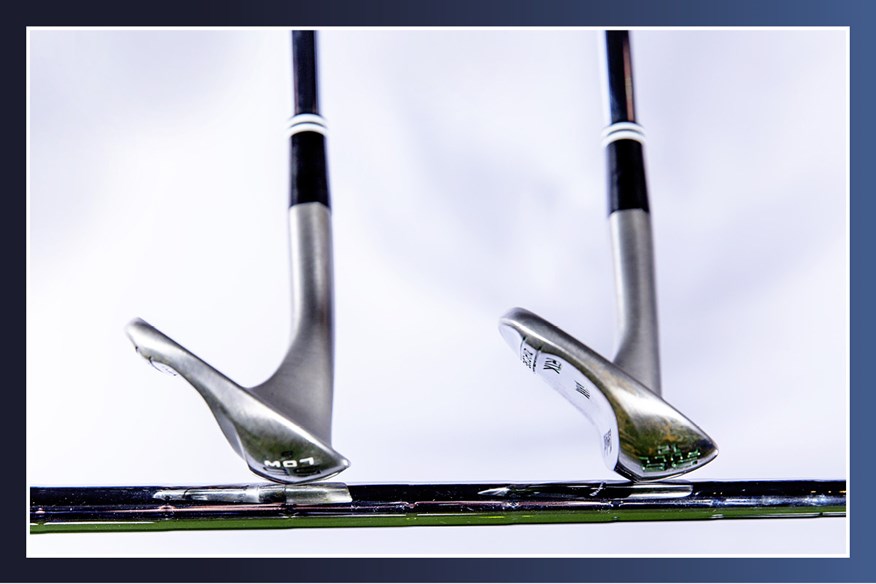
We’ve been talking a lot about using the trailing edge of the sole. As this picture shows, the trailing edge is designed to be lower than the leading edge. The angle between the two is generally termed ‘bounce’, and different wedges have different amounts – the wedge on the left has less (6º) than the wedge on the right (12º).
To discover which bounce is best for you, take a high- and low-bounce wedge to a short game area. Go to your weakest shot – it could be a bare lie chip, or a bunker shot – and see which one helps you the most.
As long as that level of bounce doesn’t hurt the rest of your short game, this would be the one to choose. But also consider the type of shots you typically play. Low bounce is typically more suited to tighter, firmer lies and more bounce is more beneficial in lush, softer conditions.
– Subscribe to Mark Crossfield’s YouTube channel
– Follow Mark Crossfield on Twitter
– Follow Mark Crossfield on Facebook
– Follow Mark Crossfield on Instagram
– Subscribe to Mark Crossfield’s podcast
READ NEXT: Putting coach Phil Kenyon saves you six shots
-
 Mark Crossfield fixes your golf short game.
-
 Mark Crossfield demonstrates some set-up changes that could improve your golf chip shots.
-
 Mark Crossfield explains how to set up to hit better golf chip shots.
-
 Mark Crossfield shows how the back edge of a golf wedge's sole works.
-
 PGA pro and YouTube star Mark Crossfield explains how to use your golf wedge.
-
 Meet your golf coach: PGA pro and YouTube star Mark Crossfield
-
 Mark Crossfield demonstrates the reasons why you misstrike your golf wedges.
-
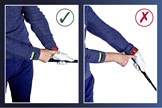 Mark Crossfield demonstrates the correct and incorrect wrist positions to play better golf chip shots.
-
 Mark Crossfield demonstrates correct and incorrect positions to help you avoid duffs and thins.
-
 Mark Crossfield explains how pitching has the same principles as chipping, just with a longer swing and demonstrates how to play with the length of your wedge.
-
 Mark Crossfield demonstrates how to establish your lines, turn together, rotate and extend when playing golf pitch shots.
-
 Mark Crossfield demonstrates how to create 'stopping points' for your golf pitch shots.
-
 Mark Crossfield demonstrates how to keep the elbows soft at the end of the pitch shot.
-
 Mark Crossfield demonstrates how changing ball position can add versatility to your short game.
-
 Mark Crossfield recommends using different clubs in the short game to alter trajectory and run out.
-
 Mark Crossfield explains why getting the ideal bounce is key to a good golf short game.
-
 Mark Crossfield demonstrates how to develop a trailing-edge motion in your golf chip shots.
-
 Mark Crossfield demonstrates how to let your trail hand release when playing golf chip shots.
-
 Mark Crossfield demonstrates how to get the chest through and up when playing golf chip shots.
-
 Mark Crossfield explains why you need to get away from your normal full shot when playing golf pitch shots.
-
 Mark Crossfield demonstrates how you can learn to release the club in pitch shots using trail-arm only swings.
-
 Mark Crossfield demonstrates some set-up changes that could improve your golf chip shots.
-
 Mark Crossfield demonstrates how to turn away and turn through your golf chip shots.
